-->

Wednesday, March 12, 2014

The Importance of a Prototyping Mindset


This article by Maureen Carroll highlights some of work that we have been doing at REDlab. One of the main components of d.loft is a design thinking class at Stanford. The students go to the East Palo Alto Phoenix Academy to mentor the middle schoolers in an after-school design thinking class. This not only exposes the kids to design thinking and STEM, it is a valuable opportunity for the Stanford students to learn how to be a mentor and the importance of always having a prototyping mindset.  


Learning from What Doesn’t Work: 
The Power of Embracing a Prototyping Mindset
                                                              
                                    By Maureen Carroll, Ph.D.
                                                          Director, REDlab

Introduction

You can read all the books beforehand, but there is nothing quite like the first moment you hold your newborn infant in your arms. Learning on the job is really what parenthood is all about. That kind of immersion is much like what Stanford University students experienced as they became mentors to East Palo Alto Phoenix Academy middle schoolers during the Spring quarter. The students were enrolled in the class Educating Young STEM Thinkers, which was part of an NSF grant called d.loft. The focus was to integrate design thinking, mentorship and STEM learning.  The students, who were a mix of engineering, math, education, and science majors, were learning design thinking- a human-centered innovation process- as they were teaching it. This article highlights how this group of dedicated and passionate students dove passionately into an experience that changed the way they thought about learning in some very small and very big ways. 

A Prototyping Mindset

 A prototyping mindset is characterized by the notion that if you try something and it doesn’t work you simply learn from it and try again. This mindset is an essential part of design thinking-it’s about failing fast and failing forward. The Stanford mentors learned to be comfortable with not knowing all the answers as they worked with the middle schoolers, something that was not easy for them to do. What happened, though, was that they realized that they were modeling the importance of making mistakes as a way to learn. 
              
One student described a activity where the middle schoolers built tin-foil boats to learn about density and volume. 

“I learned that embracing that inevitability, instead of freaking out about it or getting upset about it, usually makes everything work itself out...when we were working with the students on the boat-building activity and it turned out to be much easier than we expected, we all looked at each other and said “oh well,” thought on our feet abut how to change it, and then tried the change out. The activity worked out fantastically! The students knew that we had misjudged the challenge, but I think that seeing us react to our mistake in a positive way helped them realize that we were human and helped us to make huge steps as mentors.”   

It wasn’t easy for the university students to show their vulnerability, but when they did, they found that it helped create bonds with the middle schoolers.

“I think one thing I learned this week about mentoring is that as much as I feel anxious about “messing up” in front of the students,  it can actually be a good thing to show them that we are not perfect...our design challenge didn’t work out quite the way we wanted it to. The students figured this out, but instead of it ruining the session, they laughed with us as we tried to figure out how to make it more difficult and then rolled with it. I think it helps to bring us to an equal level of expertise, which is really important if we are trying to connect emotionally with these kids.”

Teaching a prototyping mindset while learning what it was had a strong impact on the university students. They were discovering their own feelings about taking risks, making mistakes, and what role that plays in learning as well as having to embody that mindset in their interactions with the middle school students. One student described how being forced to lead students even when she felt uncomfortable or unsure was a pivotal part of her learning experience. A future educator thought about how he might incorporate this into his own classroom one day. 

“Reflecting on my own growth throughout the quarter, I am becoming more cognizant of my discomfort with uncertainty. This discomfort finds roots in a desire for something to be perfect. Two consequences arise: I spend much of my time planning without getting feedback from my “users” or my students, or I feel stifled because planning something perfect is… impossible, actually. A prototyping mindset has directly addressed this discomfort, and I want to internalize this mindset more and see what it looks like in teaching.”

As the mentors and middle school students experienced what it meant to adopt a prototyping mindset together they were able to push the boundaries of learning. Becoming a 21st century thinker requires this sense of resourcefulness. Through this experience, the Stanford students discovered that they learned as much from the middle schoolers as they taught them. And that’s always a good thing- in ways both big and small. 

Tuesday, March 11, 2014

Empathy Mapping and Point of View Statements

It has been a while since we have posted but don't worry, we've been very busy over here at REDlab. We are going to be posting some new challenges and material from the new curriculum soon but first we wanted to showcase excerpts from a blog written by our very own Molly Zielezinski about empathy mapping and POV statements. Her entire blog post can be found here. Empathy maps and POV analysis can be helpful in human-centered design activities, preparing interviews, or any other activities where you want to get outside of yourself and into the shoes of someone else.


Above you can see an example of an empathy map conducted during a recent workshop with educators. This example was generated from a 3 minute interview with an elementary school principal. I am adding this visual to give people an idea of what it might look like to “triangulate” evidence to make an inference. In this particular example, we see single and double lines pointing from the concrete items on the left to the inferred items on the right. For example, “she created a student survey” is connected to her animated gestures and speaking, which helped the participants to infer that she sees “students’ success as more important than her own.” In that sense, we have literally drawn a triangle between several items on our empathy map. With more time, this can be repeated a great many times until you have a robust set of inferences.

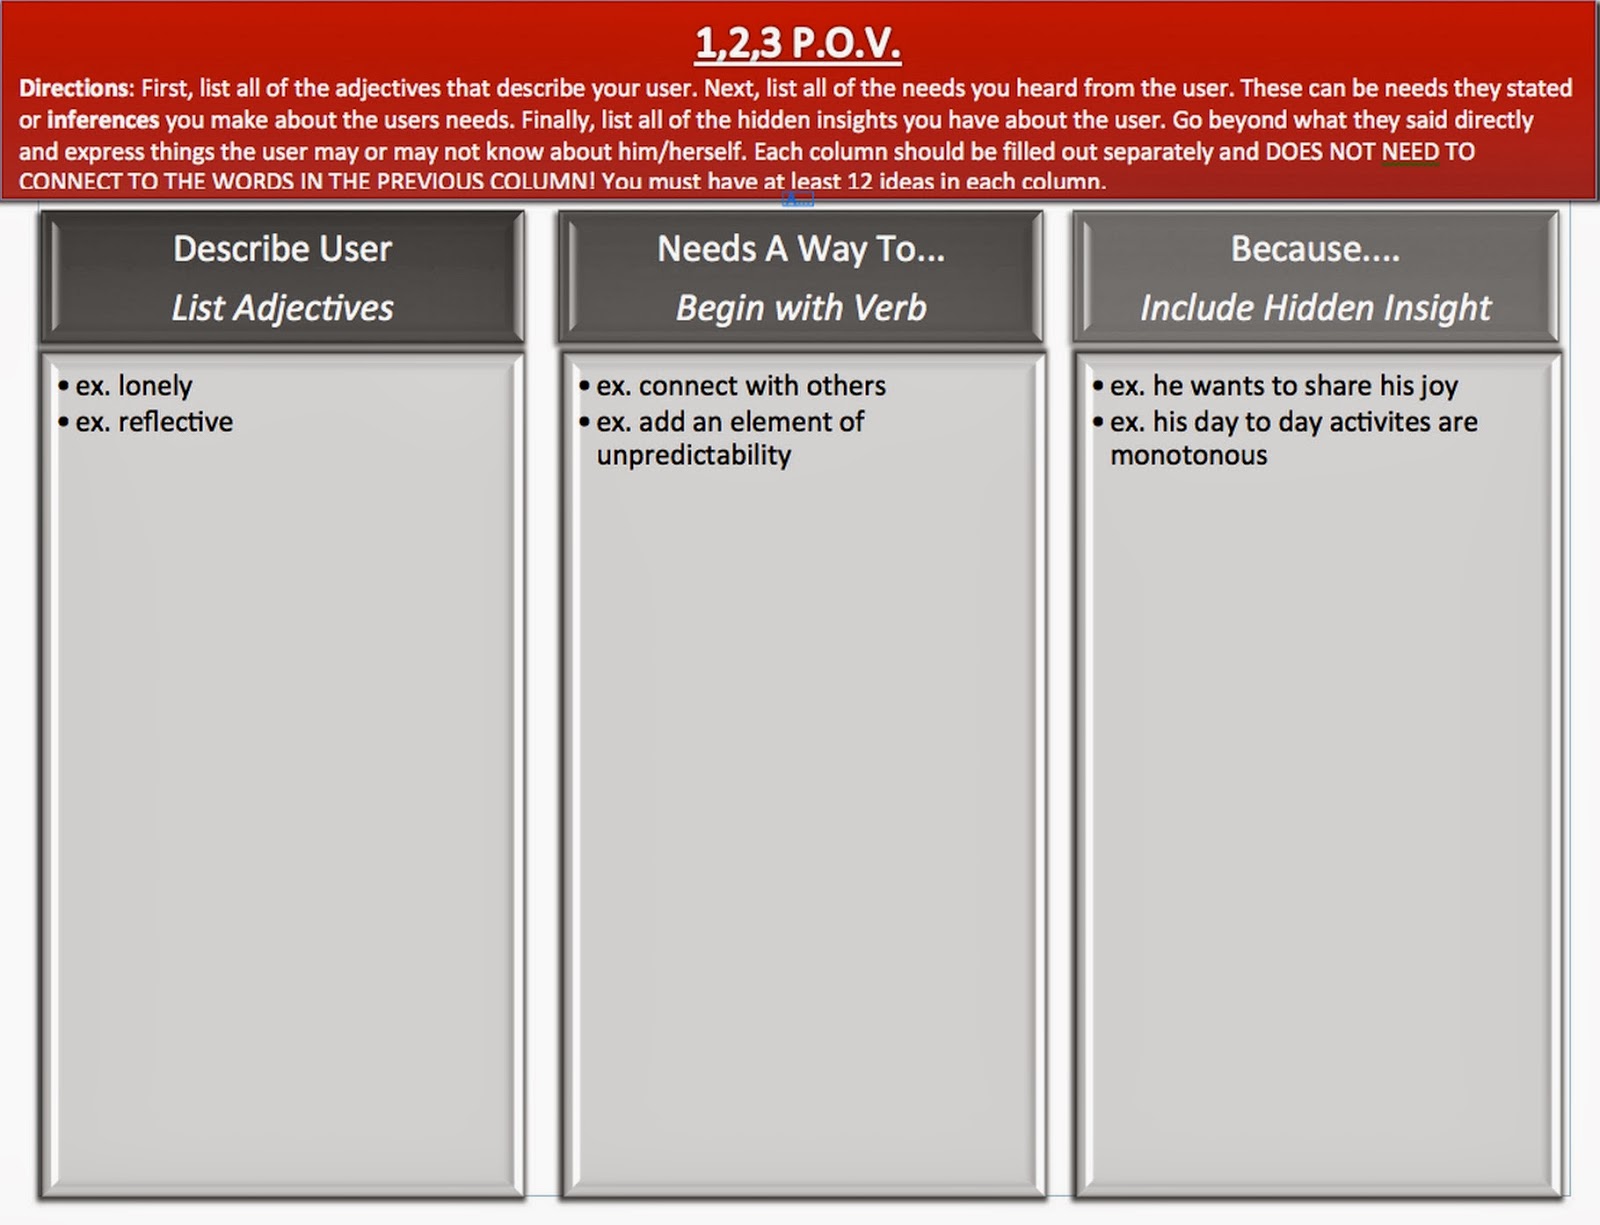
Okay, so what comes next? At REDlab and d.loft we do something called 1,2,3 POV which is a scaffold for the construction of a Point of View Statement (POV).


Above is a worksheet for this activity we have used in d.loft. The way it works is simple. First you (or preferably a team working with the data) write down as many adjectives as you can about the person interviewed. I suggest using a personality adjective list or adjective wheel for this (collected from a simple google search) since without fail we are tempted to call our subjects “passionate” which is a bit too generic for capturing the rich nature of an individual’s point of view. Next, we make a list of all of the possible needs our subject might have. In the world of the d.school and d.loft, we avoid beginning these with verbs because that is getting a bit too specific with our insights at this point in the process. There is a big difference between saying “Johnny needs a straight As” and “Johnny needs a way to improve his homework habits”.  In one case, we are applying our own perspective and values on Johnny and in the other, we are trying to get closer to his perspective, to figure out what is going on with him.  Starting with a verb is a handy trick for doing this.


Following the example from the educator workshop, we can see this activity in progress. Note how we crossed out “Nicole needs to add more time” because needing time is essentially a noun and this is what we want to avoid. At this stage in the activity, there is no connection between either column, the group is just brainstorming adjectives and needs. We are now making even more inferences about our subject. So how are these inspired? These responses come from both the raw interview data (or text or video or whatever your data source) or directly from the empathy map.


Once you have populated the first two column, you begin the synthesis process again by making connections. You link an item from column 1 to an item in column 2 and complete it with an item in column 3. In the example above we see things like “Energetic Nicole needs a way to optimize activities because she doesn’t have enough time in the day” and “Thoughtful Nicole needs a way to meet the demands of students in a student-centered way because she does not want kids to be afraid”. 

The next step in the design thinking process is called a Point of View Statement. This is where you pick the most insightful one or two statements from the previous activity and fill it in to the template. As a design thinking practitioner and coach, I believe this is the most difficult part of the process. Spending some time workshopping these with others can be painful but is extremely valuable. The more you practice this step, the more you see that changing a single word or phrase changes the entire insight.


Depending on what your activity goals, you may want to pursue a single point of view or concurrent point of view statements. In either case, this multi-step process has gotten you much closer to understanding the perspective of another than a simple guess. As I have mentioned before, this can be helpful in human-centered design activities, analysis of fictional texts, preparing to write-up or interviews, or any other activities where you want to get outside of yourself and into the shoes of someone else.


Citation:
Zielezinski, M. (2014). Empathy Mapping and Point of View Statements. Social Media for Learning. Retrieved March 10, 2014, from http://socialmedia4learning.com/visualizations/empathy-mapping-and-point-of-view-statements/

Saturday, March 16, 2013

Aluminum Foil Boats


T-MINUS 2 DAYS TIL LAUNCH!


It's a lovely Saturday for a design thinking challenge! What better way to spend some time than by doing a design thinking challenge from the new curriculum so when you do it with your students, you can tell them about your own experiences! We picked a challenge that would be easy to do from home with basic things that you would have laying around the house. We modified the instructions from the curriculum to fit doing this at home instead of leading a class.

Overview:
This lesson serves as a prototyping experiment. It also teaches students about density and surface areas as it pertains to water. Students will build boats that need to hold as much payload(coins) as possible before sinking. They can rapidly build as many boats as possible to hold more weight.

Learning Objectives: 
  • Learn about the concept of buoyancy and why things float
  • Learn about surface area and how to distribute weight
  • Learn that problem solving and design are iterative processes where solutions can constantly be refined.
Materials:
  • Aluminum Foil (approx. 12in x 12in)
  • One large plastic tub filled with water (we used a bathtub for this experiment at home)
  • Coins, or other items that can be used as weights (at least 2 lbs)
  • Additional items to make the challenge more difficult could include Paper cups, Saran Wrap, Paper clips.
Step 1: Design and Build
Take the aluminum foil and design a boat that you think will hold the most amount of coins/weight.
I got my brother to do this challenge with me. His boat is on the left.

Is it obvious that I just watched a show about the Vikings?

Step 2: Test
Place the boat into the water tub/ bathtub and start adding the coins or weights. Count the number of weights it takes for the boat to sink.

Brother putting his boat in the water

How much weight will it hold?
Step 3: New Prototype and Retest
After your boat has sunk, think of ways to improve the boat and build a new prototype. Test the new prototype and see if you get better results. If you want to make the challenge harder, try to add different materials like paper cups to the boat and see what you can come up with! 


How much weight were your boats able to hold? What insights did you find? We'd love to see your results! 


Friday, March 15, 2013

Intro to the curriculum

An excerpt from the curriculum on the goals and ways to integrate it into your classroom:

Dive In! An Integrated Design Thinking/STEM Curriculum provides an integrated approach to building science, technology, engineering and math knowledge and skills while engaging students in both identifying and solving problems in their communities and the larger world using a design thinking approach.
 The focus of this year’s curriculum is water. In this four-week program, students will dive into a range of high-energy activities as they solve water-based challenges. They will be immersed in learning about the water conservation, drought, purification, recycling, patterns of use, products that have been designed for those in developing countries and other topical issues that impact global water usage. As they conduct interviews and do observations, they will develop empathy. Data synthesis provides the opportunity to uncover deep user needs and insights. Highly generative brainstorming techniques will give student tools to create solutions. They will build prototypes, test them, and incorporate user feedback. Students will leave the program with the creative confidence to become active problem solvers in innovative, human-centered ways that will help them confront the challenges and possibilities that surround us in the 21st century.
The Dive In! An Integrated Design Thinking/STEM Curriculum Teacher Guide provides an overview of the project goals, background information on design thinking, teaching tips, a curriculum calendar overview, descriptions of materials, lesson plans, and material lists and resources.
For first-time teachers or teachers who would prefer to dive straight in, the lessons in this curriculum are laid out in such a way that they form a cohesive curriculum when taught in the order they are presented – just keep turning the page.


3 days until the launch!